Regex to Split Single Line Address

I had the need come up in a project to split an address that gets inputted in a single line and has no validation. Apart from the obvious fix of requiring validation and saving the fields in different columns I had to come up with the best way to to split out that address so that we could wrap it in a rich snippet. This is a Regex I found, I cannot find it again..so if someone knows the original source/author please let me know so I can give the correct credit.

Since I am having such a hard time finding anything that is close to this I figured it necessitated a blog post to get the information out there.

//Splits Address formatted like this.. 1045 E Test Lane, Gilbert, AZ 85296
Regex splitAddressRegex =
new Regex(@"(?(^[^,]*,[^,]*,[\w\s]*$) # If check Condition for 2 commas if so match below
(?[^,]*)    # Place into capture group Line1
(?:,\s)     # Match but don't place into capture.
(?[^,]*)    # Place into capture group City
(?:,\s)     # Match but don't place into capture.
(?\w\w)     # Place into capture group State
(?:\s*)     # Ignore spaces
(?[\d\-]*)  # Place int Zip
(?:$|\r\n)  # Match/No group either $ or \n\r
|           # Else its a bigger address
(?[^,]*)    # Place into capture group Line1
(?:,\s)     # Match but don't place into capture.
(?[^,]*)    # Place into capture group Line1
(?:,\s)     # Match but don't place into capture.
(?[^,]*)    # Place into capture group City
(?:,\s)     # Match but don't place into capture.
(?\w\w)     # Place into capture group State
(?:\s*)     # Ignore spaces
(?[\d\-]*)  # Place int Zip
(?:$|\r\n)  # Match/No group either $ or \n\r
)", RegexOptions.IgnorePatternWhitespace);

It’s a pretty in-depth and ugly Regex but you end up with the address split into groups. So if you run the address: 1045 E Test Lane, Gilbert, AZ 85296

You end up with groups such as..

matchedAddress.Groups["Line1"].Value //1045 E Test Lane

The comments in the Regex snippet show you the group names. Again, I did not make this and would love to give credit but can’t find the original source and definitely want to have it published as it saved me a lot of time.
How to Use Git and Simple Git Commands

This is a very vast concept and way too much for one post so I will start off basic and add subsequent posts as I go deeper. The first step is to obviously install Git. At the time of writing this I am using Git 1.8.1.2. Since this lends itself to personal preference and team preference I will not cover the install.
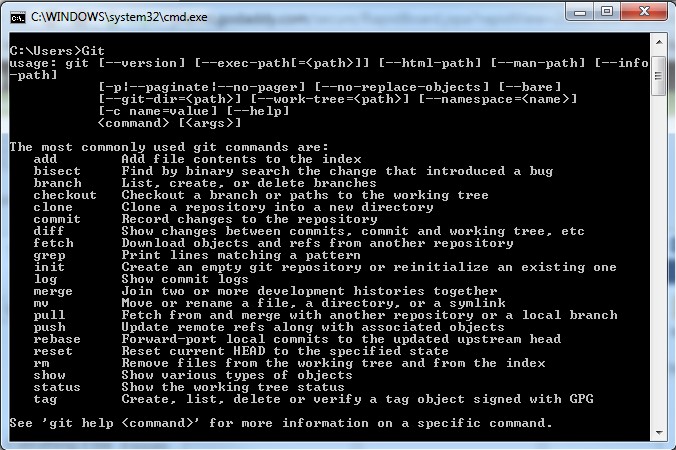
Once you have Git installed, let’s open a command prompt. The very first command I want you to run is simply: Git. This will ensure that you installed Git and we are ready to go. You should see a screen as such below.

Simple Git Commands 1

If you see this output from your command line then you are set up and we are ready to get started. The next step we need to do is create a local folder that we will use as our Git Repository.

-Create a folder at C:\GitRepo
-Use your command line and change directories to new created directory.
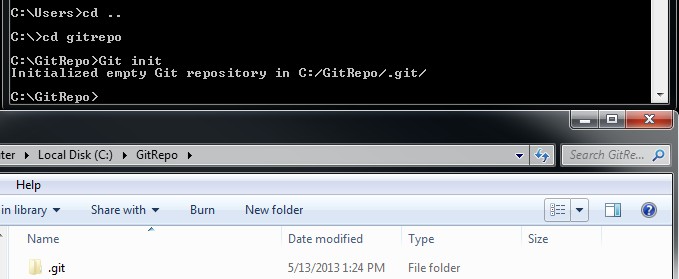
-Run Git Command:  Git init
-Verify you have the results below.

Simple Git Commands 2

The top being the command prompt and the bottom showing the folder you created and now a .git file. The .git file is a Git repository and will host all the files that we add and commit to it throughout this tutorial. The next thing we need to do is set some global config settings so that we have a username and email associated with our commits.

-Run Git Command: Git config --global user.name "Adam Drummond"
-Run Git Command: Git config --global user.email "adam@adamthings.com"

Now let’s make our first commit. In the directory we created C:\GitRepo lets create a text file and add a line of content to it. We will then add this to our repository and then commit it.

-Create text file name MyFirstCommit.txt
-Add some content to text file.
-Run Git Command: Git add MyFirstCommit.txt

At this point in time, our file is in what would be considered a staging area. It’s been adding to the repository but it has not been ‘checked in’ or ‘committed’ to the repository.

-Run Git Command: Git commit --m "This is my first commit."

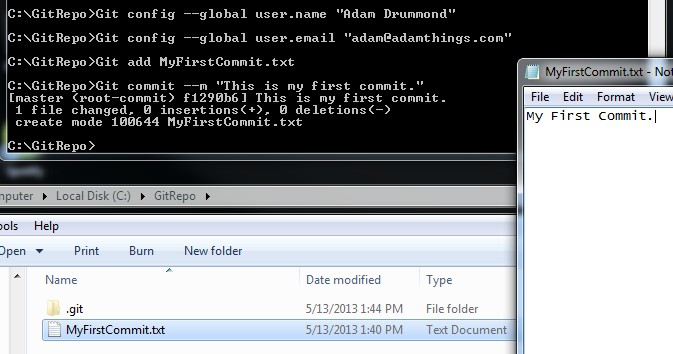
This should be what your current state looks like.

Simple Git Commands 3

The last piece we will cover in this blog post is seeing the history of what has happened. For this we will use the following command.

-Run Git Command: Git log --oneline --graph --decorate –all

Since we have only made one commit, our graph is only one line.

Simple Git Commands 4

This graph will continue to grow in the next blog post as we add some branching in Git. Stay Tuned.

Limiting TextArea Characters In Internet Explorer

In my last project I ran into an annoying nuance of IE9 but turned out to be IE (Internet Explorer) in general.  IE does not like to acknowledge the maxLength property that you can set on a <textarea> tag.  In FireFox as well as in Chrome you could set this property to the desired length and the browser would acknowledge this and stop user input at the desired length.  Take a look at the following snippet.

<textarea id="limitChars" rows="5" cols="86" maxlength="1000">

In this snippet, the attribute to look at is maxlength=”1000″.  Make sure you have this set as it works well in FireFox and in Chrome.  Now, let’s talk about Internet Explorer.  From my project it looks like IE7, IE8, IE9, and IE10 don’t care about the maxlength attribute and will let the user keep typing long beyond what you desire.  So there are two pieces to this puzzle that I found fit my likings best.  The first is we bind the <textarea> to the keyup event like so.

$('# limitChars').keyup(function () {
     //Code
});

In binding the textarea to this keyup event it will be fired on every keystroke.  So inside of this event we now just have to check the length of characters in the texarea and either do nothing or we will cut it down.  So let’s add the code in the middle.

$('#limitChars').keyup(function () {
     //Get the value of the textarea.
     var valueOfInput = $("#limitChars").val();

     //Check and see if its over our desired limit.

     if (valueOfInput.length > 1000) {
          //We reset the characters they have typed and cut it off to 1000.

          $("#limitChars").html(valueOfInput.substr(0, 1000));
     }
});

It causes a bit of weird behavior when they get to the limit but up until that limit it works quite well.


Create Local Business Rich Snippet

I thought it would be nice to right out a little how to on a recent task I did for a site I manage (www.mrdscarpetcleaning.com).  Rich Snippets are a bit of a new thing when it comes to SEO and running a small business.  There are tons of different snippets and snippet variations that can be found on http://schema.org/.  For right now I am only going to show a local business.

The first part that will be looked for by the search engine is the itemscope and itemtype attributes.  This is going to basically tell the search engine this is a snippet and also what kind.  For a local business it is as follows.

<div itemscope itemtype="http://schema.org/LocalBusiness">

From here on out we build out the snippet with the name address.  Take note that there is actually a second snippet in here that is denoted by the itemtype=”http://schema.org/PostalAddress” attribute.

<span itemprop="name">Mr. D's Carpet Cleaning</span>
<div itemprop="address" itemscope temtype="http://schema.org/PostalAddress">
     <span itemprop="streetAddress">731 N 25th St.</span>
     <span itemprop="addressLocality">Mesa</span>,
     <span itemprop="addressRegion">AZ</span>
     <span itemprop="postalCode">85213</span>
</div>

The last part for this snippet will be including the contact information.  You can add the phone number and the website for your small business.

Phone: <span itemprop="telephone">(480) 628-3788</span><br />
Website: <a style="color: black;" itemprop="URL">http://www.mrdscarpetcleaning.com/</a>

Now, if we put this all together you will get a full rich snippet for your local business.  Take a look at the following.

<div itemscope itemtype="http://schema.org/LocalBusiness">
     <span itemprop="name">Mr. D's Carpet Cleaning</span>
     <div itemprop="address" itemscope itemtype="http://schema.org/PostalAddress">
          <span itemprop="streetAddress">731 N 25th St.</span>
          <span itemprop="addressLocality">Mesa</span>,
          <span itemprop="addressRegion">AZ</span>
          <span itemprop="postalCode">85213</span>
     </div>
     Phone: <span itemprop="telephone">(480) 628-3788</span><br />     
     Website: <a style="color: black;" itemprop="URL">http://www.mrdscarpetcleaning.com/</a>
</div>

One side note to keep in mind.  If you run your site through html validators make sure that it handles HTML5 tags.  As you can see in the example the itemscope attribute doesn’t have a value after it as it’s a Boolean value it does not need anything after it in HTML5.  If you can’t change the version and your validator is saying this is invalid you can update your attribute to:

<div itemscope="itemscope" itemtype="http://schema.org/LocalBusiness">

By setting it to itself you are in a sense tricking the validator to say that this value is true.


Difference Between Dictionary and Hashtable

A guy asked me the other day, what is the difference between a Dictionary and a Hashtable?  I found myself stumbling a bit so I thought it would a good topic for me to write about and help me understand further.  A Dictionary is a generic type Dictionary<TKey, TValue> that allows static type which gets verified at compile-time as well as you can use a Dictionary without boxing.  I am finding that using a Dictionary in .Net 2.0 and above is the preferred way to go.

A Hashtable is not a generic type and requires boxing when you are dealing with value types.  A nice perk to using a Hashtable is that it allows multiple reader threads with one reader thread making a Hashtable thread safe where a Dictionary does not offer thread safety.  Another difference is that in a Dictionary when you request a non-existing key an exception will be thrown.  However, when you request a non-existing key in a Hashtable; a null is returned.

There is an alternative in .Net 4.0 for a Dictionary that is called ConcurrentDictionary<TKey, TValue>.

Here is an example of a simple ConcurrentDictionary from MSDN http://msdn.microsoft.com/en-us/library/dd287191.aspx.

class CD_Ctor
{
        // Demonstrates: 
        //      ConcurrentDictionary<TKey, TValue> ctor(concurrencyLevel, initialCapacity) 
        //      ConcurrentDictionary<TKey, TValue>[TKey] 
        static void Main()
        {
            // We know how many items we want to insert into the ConcurrentDictionary. 
            // So set the initial capacity to some prime number above that, to ensure that 
            // the ConcurrentDictionary does not need to be resized while initializing it. 
            int NUMITEMS = 64;
            int initialCapacity = 101;

            // The higher the concurrencyLevel, the higher the theoretical number of operations 
            // that could be performed concurrently on the ConcurrentDictionary.  However, global 
            // operations like resizing the dictionary take longer as the concurrencyLevel rises.  
            // For the purposes of this example, we'll compromise at numCores * 2. 
            int numProcs = Environment.ProcessorCount;
            int concurrencyLevel = numProcs * 2;

            // Construct the dictionary with the desired concurrencyLevel and initialCapacity
            ConcurrentDictionary<int, int> cd = new ConcurrentDictionary<int, int>(concurrencyLevel, initialCapacity);

            // Initialize the dictionary 
            for (int i = 0; i < NUMITEMS; i++) cd[i] = i * i;

            Console.WriteLine("The square of 23 is {0} (should be {1})", cd[23], 23 * 23);
        }
}


StackOverflow Profile